2 Student Accounts
All student accounts can be viewed and managed from the students menu within the coordinator dashboard.
Students do not need to log in to their accounts until a challenge is live.
Note: All student accounts are removed in August of each year. Please do not create new accounts until September of the new school year.
2.1 Group Codes
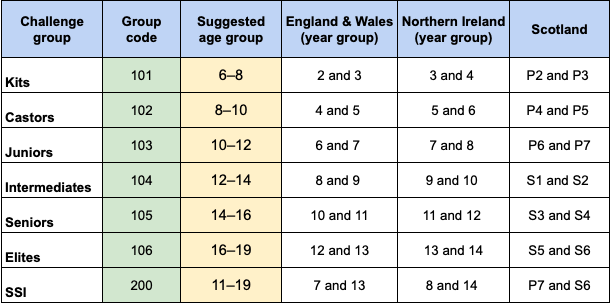
Each group has a unique group code. When creating a student account, you must use the correct group code. If a student is assigned the wrong code, they will not be able to access the correct challenge when they log in. Please check the group code table when creating student accounts.
2.2 Bulk upload student accounts
It may be easier to bulk upload student information to create accounts. The system will accept Excel spreadsheets or CSV files.
There are three stages to importing your students' data:
- Prepare the spreadsheet(s)
- Upload the spreadsheet(s)
- Import the data
You can "undo" an import if it all goes wrong!
Preparing your spreadsheet
Step 1 Open a spreadsheet and label the first five columns as shown, in this exact same order:
Class, Group code, Firstname, Lastname, Gender
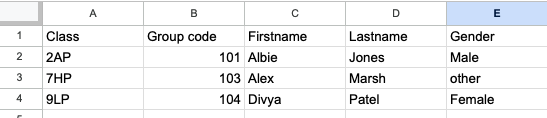
Column information:
Class: This is your own class reference. This information will allow you to filter students and sort results when they are exported after the challenge.
Group code: It is VERY IMPORTANT to specify the correct group code for each student so that they participate in the age group that is appropriate for them as an individual. Please use the table to determine the appropriate code for your students.
Firstname: The student’s first name. This information will be included on any certificate awarded to the student so please make sure it uses the name used by the student.
Lastname: The student’s last name (this will also appear on the certificate).
Gender: Specify the best gender description, using only male, female, or other. This data is useful to us for research purposes (for example, research into gender bias of the questions). Any research is only done using completely anonymised data.
The system will automatically assign a username and password.
The username will start with the first letter of the student’s first name, followed by their surname and additional digits to ensure uniqueness across the UK Bebras system.
The password will begin with the letter p followed by five digits, e.g. p12345. If you wish, you can create your own passwords. To do so, add a column for Password as the final column. Any passwords specified will override the system-generated password.

If you are importing data from a school system, make sure that it is in the format required as shown above (e.g. replace M with male).
Upload your spreadsheet(s)
To upload your spreadsheet(s), follow these steps.
Step 1 From the admin menu, select Import files.
Step 2 Drag and drop your files to the upload area or click within the upload box.
Step 3 Once you have imported the file, you will be taken to a preview of the data.
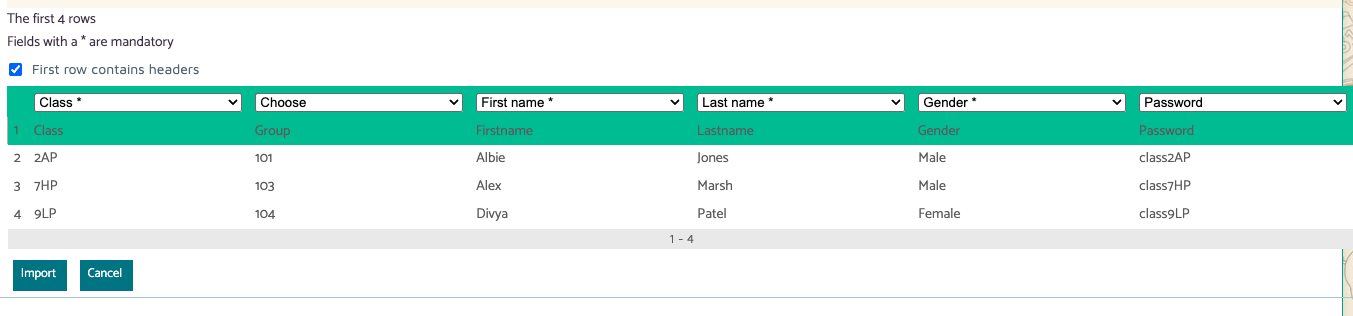
- If the first row contains headers, make sure to tick the box "First row contains headers" so that this is not imported as student data.
- Check the headings in the drop-down match the correct headings for the data.
- Make sure data is in the correct column.
Step 4 Once you are happy with the data, click import. A window will display confirming the number of students imported and you will be returned to the import files menu. You should now see that your file has been imported.
Note: When importing your student data, if you see a timeout error, please allow additional time for the system to upload your student data in the background. Please do not import the file again. This will result in duplicate students.

Step 5 Check that your student data has been imported correctly by going to the students menu.
If the data is incorrect:
- Click on undo import which will delete all associated student accounts.
- You can re-import the file if there were issues with the columns or
- Delete the file and re-upload a new file.
Student accounts that have been imported from a file will be indicated in the students menu in the source column.

2.3 Creating individual student accounts
You may wish to create an individual account for a student who joins the class after accounts have already been created.
To create an individual student account:
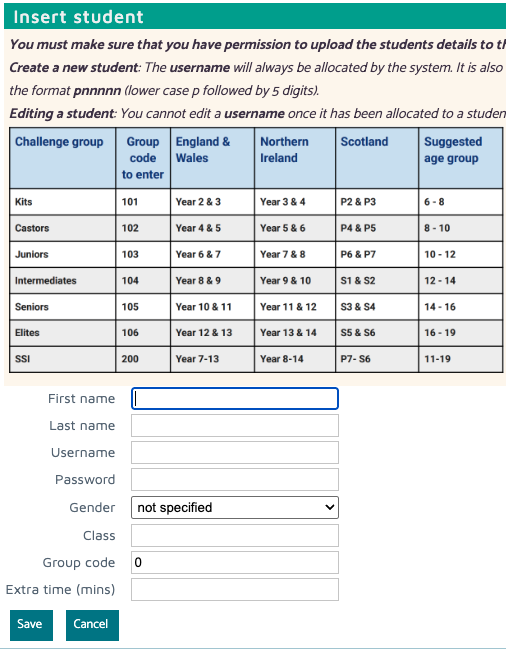
Step 1 Select the Students option on the admin panel, then click the New button.
Step 2 Provide the First name, Last name, Gender, Class, Group Code, and Extra time.
- Extra time should be specified in minutes.
- It is best to let the system generate the Password (so leave this field blank).
- Gender is optional, but this information is used by us for research purposes so we would be grateful if you are able to provide it.
- Make sure to use the correct group code from the table.
2.4 Skeleton Accounts
This feature can be useful if the challenge fortnight has already started and you have not yet created accounts for your users (and you don’t have time to prepare a spreadsheet).
When you use skeleton accounts, the students will be prompted to enter their details when they log in, which may take some time. The details entered will appear on their certificate. This approach is not recommended for younger participants on the day of the challenge because entering their details may take longer than is practical.
Step 1 Click on Create skeleton accounts (in the Students panel). A screen will appear with a suggested Username prefix. This is usually an abbreviation of the school name or you can amend the prefix. This prefix will be used to create the usernames for the students.
Step 2 Fill in the Number of users to create, the Group code, and the Class (if appropriate). Then click on Create to create that number of skeleton users.
Step 3 Once the accounts are created you can either:
- Create more users by repeating the instructions above.
- Stop and show list of users.
2.5 Student search filters
There are many search filters available in the students menu.
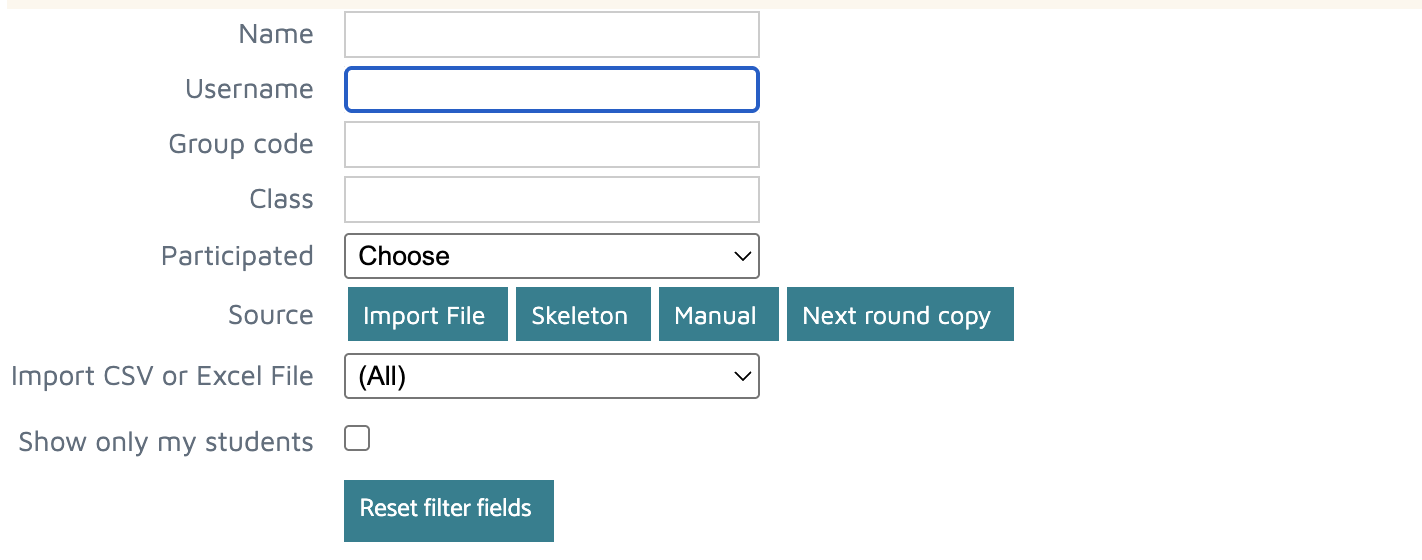
You can filter by:
- Name
- Username
- Group code
- Class
- Participated - Choose the challenge which they have participated in.
- Source - Filter by whether the student account was created from an imported file, skeleton account or manually
2.6 Severely Sight Impaired (SSI) students
Students aged 10–19 who are severely sight impaired can take part in a dedicated SSI version of the Bebras Challenge. To access this challenge, students must be assigned group code 200.
These tasks do not use images and are written with students using screen-readers in mind. Students should make sure that their preferred screen-reader software is suitable by testing it with a previous SSI challenge from the challenges page on the UK Bebras website.
2.7 Teams
Students participating in the Kits and Castors groups can participate as a small team of up to 3.
Adding students to teams after the contest:
Go to the teams menu.
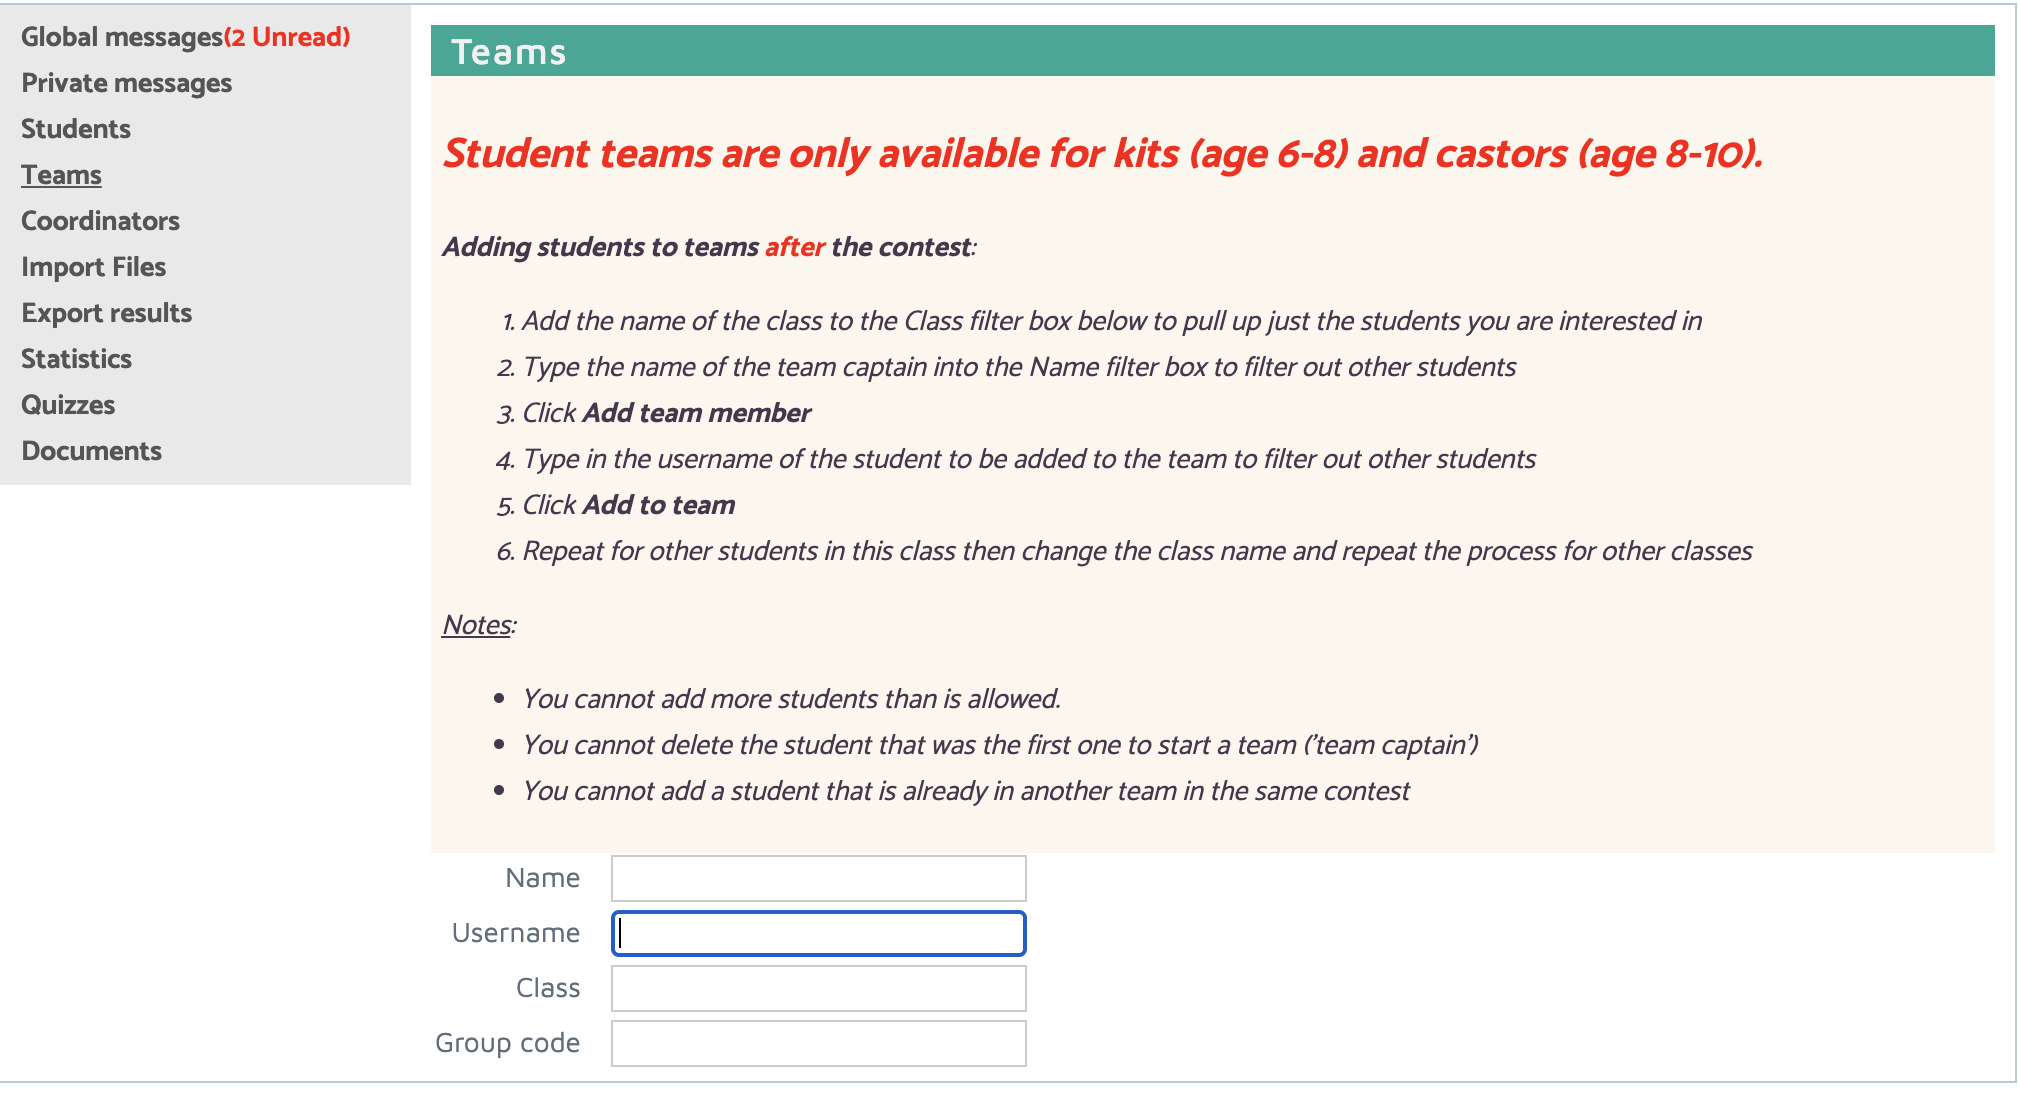
- Add the name of the class to the Class filter box below to pull up just the students you would like to add.
-
Enter the team captain's name in the Name filter.
-
Click Add team member
-
Enter the username of the student you wish to add
-
Click Add to team.
-
Repeat for other students in this class then change the class name and repeat the process for other classes.
Note:
-
You cannot add more students than is allowed.
-
You cannot delete the student that was the first one to start a team ('team captain')
-
You cannot add a student that is already in another team in the same contest
Return to guide